Welcome to the comprehensive guide for assembling your L-shaped desk! This detailed instructions will walk you through each step, ensuring a sturdy and functional workspace.
Overview of the Assembly Process
Assembling an L-shaped desk involves a systematic approach to ensure stability and functionality. The process begins with preparing tools and organizing components, followed by constructing the frame, attaching the desktop, and installing drawers or shelves. Each step requires patience and attention to detail to align parts correctly. The instructions guide you through tightening bolts, ensuring levelness, and securing all elements firmly. By following the PDF guide meticulously, you’ll achieve a sturdy and visually appealing workspace tailored to your needs.
Importance of Following the PDF Guide
Following the PDF guide ensures a smooth and accurate assembly process. It provides clear, step-by-step instructions to avoid errors and potential damage to components. The guide highlights safety precautions, tool requirements, and proper techniques to guarantee stability and functionality. By adhering to the instructions, you minimize risks of misalignment or structural weakness, ensuring your L-shaped desk is both durable and visually appealing. Proper assembly also extends the lifespan of your furniture, making the PDF guide an essential resource for a successful project.

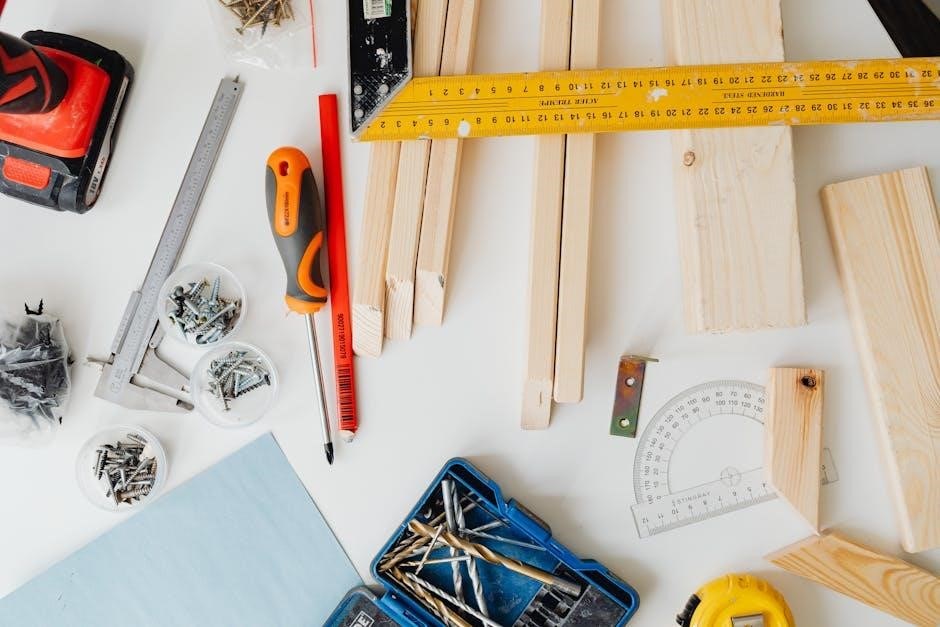
Tools and Materials Required
Gather essential tools like Allen wrenches, screwdrivers, and a hammer. Materials include pre-drilled panels, screws, bolts, and connectors for a secure setup.
List of Essential Tools
To assemble your L-shaped desk, you’ll need a set of basic tools. These include an Allen wrench (3mm and 5mm), a Phillips screwdriver, a flathead screwdriver, a rubber mallet, and a tape measure. Additionally, have a pencil and marker handy for marking drill points or alignment guides. Ensure all tools are in good condition to avoid stripping screws or damaging components. Having a socket wrench or adjustable wrench can also be helpful for tighter bolts. Keep all tools organized and within reach to streamline the assembly process.
Materials Provided in the Package
The L-shaped desk assembly package typically includes pre-drilled desktop surfaces, metal frame components, drawers, shelves, and hardware like screws, bolts, and cam locks. You’ll also find cable management accessories and sometimes pre-attached glides for smooth drawer operation. The desktop may be made of engineered wood or glass, depending on the model. Ensure all parts are accounted for by cross-referencing with the provided inventory list. The package should also include an instruction manual or PDF guide to help you navigate the assembly process efficiently.

Preparation Before Assembly
Begin by clearing a spacious work area and ensuring all components are unpacked and organized. Gather tools and review the PDF guide thoroughly to ensure smooth assembly.
Unpacking and Organizing Components
Begin by carefully opening all boxes and inspecting for damage. Categorize parts like legs, frames, and hardware. Use the PDF guide to identify and label each component. Count all screws, bolts, and accessories to ensure nothing is missing; Organize pieces by size and type, referencing the guide for clarity. Assign a dedicated area for each category to avoid confusion. Finally, double-check the inventory list to confirm all items are accounted for before starting assembly.
Setting Up the Workspace
Choose a large, flat, and stable area for assembly. Clear the space of clutter and ensure it’s even. Cover the floor with a protective sheet to prevent damage. Position the desk components near the assembly area to minimize movement. Gather all tools and keep the PDF guide within easy reach. Ensure good lighting and consider using a soft surface, like a mat, to lay out parts. Organize tools and components in logical groups for quick access. Remove any tripping hazards and ensure everything is at arm’s length for efficiency.

Step-by-Step Assembly Guide
Follow the structured process to build your L-shaped desk efficiently. From frame assembly to final touches, each step is designed for clarity and precision.
Assembling the Desk Frame
Begin by laying out the frame components. Attach the legs to the base using the provided bolts. Ensure all connections are secure and align properly. Next, connect the side panels to the base frame using the Allen wrench. Tighten all screws firmly. Finally, assemble the corner support and attach it to both sides to form the L-shape. Double-check all bolts for tightness before proceeding to the next step. A sturdy frame is essential for the desk’s stability and durability.
Attaching the Desktop Surface
Place the desktop face down on a soft surface to prevent scratching. Align the pre-drilled holes with the frame, ensuring proper positioning. Insert brackets into the desktop holes to secure the screws. Carefully flip the desktop and position it on the frame, seeking assistance if needed due to its weight. Attach the desktop using provided screws, starting with corners for alignment, then securing other points evenly. Use an Allen wrench and screwdriver, ensuring screws are tight but not overtightened to avoid damage. Check alignment and adjust if necessary for stability and functionality.
Installing Drawers and Shelves
Begin by unpacking the drawer and shelf components, ensuring all hardware is included. Attach drawer slides to the desk frame using the provided screws, aligning them with pre-drilled holes. Place drawers onto the slides, ensuring smooth operation. For shelves, position them on the desktop or frame, securing with bolts or brackets. Tighten all connections firmly to ensure stability. Double-check alignment and fit, making adjustments as needed. Test drawers and shelves for proper movement and levelness before final use.

Troubleshooting Common Issues
Identify and resolve assembly issues promptly to ensure stability. Check for missing parts, loose connections, and alignment problems. Refer to the guide for solutions and adjustments.
Identifying Missing or Damaged Parts
Before starting assembly, thoroughly inspect all components for completeness and damage. Cross-reference each item with the provided inventory list. If any parts are missing or damaged, contact the supplier immediately. Use the diagrams in the PDF guide to verify the condition of critical components like screws, bolts, and frame sections. Addressing these issues early prevents delays and ensures a smooth assembly process. Keep all packaging materials until assembly is complete to avoid accidental discarding of small parts.
Resolving Alignment Problems
If components do not align properly, check for correct part orientation and placement. Use shims or adjust leg heights to ensure the desk is level. Tighten all connections firmly but avoid over-tightening, which may strip screws. If misalignment persists, consult the PDF guide for troubleshooting tips or contact customer support. Proper alignment is crucial for stability and functionality, so address any issues before proceeding to avoid structural weakness. Regularly verify the desk’s levelness during assembly to ensure a professional finish.

Safety Tips and Precautions
Always wear safety gloves and eyewear. Use tools correctly to avoid accidents. Keep children away and ensure a stable work environment. Follow instructions carefully.
Handling Heavy Components Safely

Always lift heavy components with a second person or use a dolly to avoid strain. Ensure components are securely placed on a stable surface. When lifting, bend at the knees and keep the load close to your body. Never lift above shoulder height or twist while carrying heavy parts. Clear the workspace of obstacles to prevent tripping. Follow the manufacturer’s weight guidelines and use proper lifting techniques to avoid injury. Protective gloves and footwear are recommended for added safety.
Avoiding Damage to the Desk or Tools
Use protective gear like gloves and eyewear to prevent injuries. Lay components on soft surfaces to avoid scratches. Avoid overtightening screws, as this can strip threads or crack surfaces. Use the correct tools for each task to prevent damage to hardware or finishes. Keep the workspace clean and clear of debris to avoid accidental damage. Regularly inspect tools for wear and tear to ensure they function properly. Store unused parts in their original packaging to maintain their condition.

Final Checks and Completion
Ensure the desk is stable, all parts are securely attached, and the surface is level. Double-check all bolts and screws for tightness to guarantee durability and safety.
Ensuring Stability and Levelness
To ensure your L-shaped desk is stable and level, start by placing it on a flat, even surface. Use a spirit level to check the desktop and frame alignment. If necessary, adjust the desk’s leveling feet or use shims to balance it. Tighten all connections firmly to prevent wobbling. Double-check that all legs are evenly in contact with the floor. Finally, test the desk by gently rocking it to confirm stability. A level and stable desk ensures safe and efficient use for years to come.
Tightening All Bolts and Screws
Tightening all bolts and screws is essential for ensuring the structural integrity of your L-shaped desk. Using the provided Allen wrench or screwdriver, systematically tighten each connection, starting from the bottom frame and working your way up. Ensure all joints are secure but avoid overtightening, which could damage the material. Double-check each bolt and screw, especially around the desktop and shelf attachments. Proper tightening guarantees a sturdy and durable workspace, preventing wobbling or instability over time. Once completed, gently rock the desk to confirm its stability.

Congratulations! You’ve successfully assembled your L-shaped desk. Ensure all parts are securely tightened and double-check for stability. Enjoy your newly organized and functional workspace!
Final Inspection and Usage Tips
After completing the assembly, perform a thorough inspection to ensure all components are securely fastened and properly aligned. Check the desk’s stability and levelness to guarantee even surfaces. Test all drawers and shelves for smooth operation. Once satisfied, your L-shaped desk is ready for use. Maintain it by regularly tightening bolts and cleaning surfaces. Proper care will extend its durability and keep your workspace efficient and organized for years to come.
Importance of Proper Assembly for Durability
Proper assembly is crucial for ensuring the durability and stability of your L-shaped desk. Incorrectly tightened bolts or misaligned parts can lead to wobbling, structural weakness, or even damage over time. By following the instructions carefully, you ensure all components are secure and functioning as intended. This not only extends the lifespan of your desk but also guarantees a safe and reliable workspace. Taking the time to assemble it correctly pays off in the long run, providing years of reliable service and performance.